Physical Light Units
Lights, the sky and the camera use real-world photometric units. A lamp is set in lumens, the sun in lux, a screen or sky in nits, and the camera exposes the result like a real camera, with an exposure value (EV100). A scene lit with the values from a lamp's box or a light meter looks natural without tuning, and the same light works in a dim interior and in daylight, because the exposure adapts and the light does not have to.
Units
| Quantity | Unit | Meaning | Used by |
|---|---|---|---|
| Luminous flux | lumen (lm) | Total light a source emits. The number printed on a bulb's box. | Point, spot and area lights with IntensityUnit Lumen |
| Luminous intensity | candela (cd) | Light per solid angle in one direction. A bare point source of 1 cd emits 4π lm. | Point and spot lights with IntensityUnit Candela |
| Luminance | nit (cd/m²) | Brightness of a surface as seen by the camera. | Area lights with IntensityUnit Nits, the sky, emissive materials |
| Illuminance | lux (lm/m²) | Light arriving at a surface. What a light meter reads. | Directional light, sky calibration |
| Exposure value | EV100 | Camera setting that maps scene luminance to the image. One EV is a factor of 2. | Camera component |
The renderer works in candela for point and spot lights, nits for area lights and emissive surfaces, and lux for directional lights. Lumens are converted when the light is extracted, so either unit costs the same.
Units per light type
| Light | Units | Editor default | Conversion from lumens |
|---|---|---|---|
| Point | Lumen, Candela | 800 lm, 2700 K (a 60 W household bulb) | cd = lm / 4π |
| Spot | Lumen, Candela | 800 lm, 3000 K, Reflector on | Reflector on: cd = lm / Ω, with Ω = 2π(1 − cos(outer angle / 2)). Reflector off: cd = lm / 4π |
| Rect | Lumen, Nits | 1000 lm, 4000 K, 1 × 1 m | nits = lm / (π · area) |
| Disk | Lumen, Nits | 1000 lm, 3000 K, radius 0.5 m | nits = lm / (π · area) |
| Cylinder | Lumen, Nits | 3350 lm, 4000 K, radius 0.013 m, length 1.2 m (a T8 tube) | nits = lm / (π · area); the area includes the end caps when EndCaps is on |
| Directional | lux | 110,000 lux, 5700 K (the sun at noon) | none |
A few details:
- Lumens keep the output when you resize an area light. A rect light of 1000 lm stays at 1000 lm when it grows; its surface gets dimmer. In Nits the surface keeps its brightness and the total output grows with the area.
TwoSidedrect and disk lights emit from both faces, so their emitting area, and the lumens for a given luminance, double.Reflectoronly matters while a spot light is in lumens. On, the spot behaves like a lamp with a reflector: all its lumens go into the cone, so narrowing the cone makes the beam brighter. Off, it behaves like a bare bulb behind a mask: the beam keeps its brightness and the light outside the cone is lost.- Changing the unit in the editor converts
Intensity, so the light looks the same. - Lights created from code default to Candela (point, spot) and Nits (area lights).
The light header in the inspector shows the output of the selected light in the other units, and warns about implausible values.
Colour temperature
Light colour is set as a blackbody temperature in kelvin when UseColorTemperature is on (the default for new lights). The colours are white-balanced so that 6500 K (daylight, D65) renders white. Lower temperatures are warmer, higher ones cooler:
| Source | Kelvin |
|---|---|
| Candle flame | 1850 |
| Sodium street light | 2100 |
| Incandescent bulb, warm-white LED | 2700 |
| Halogen lamp | 3000 |
| Office fluorescent, neutral LED | 4000 |
| Sun at noon on the ground | 5700 |
| Sun above the atmosphere | 5900 |
| Overcast daylight | 6500 |
The colour only sets the hue: it is normalised to luminance 1, so changing the colour never changes the brightness.
The camera has a matching white balance (White Balance group): WhiteBalanceKelvin (default 6500 K) is the temperature that renders as neutral white, WhiteBalanceTint shifts from green (−1) to magenta (+1). Setting it to 2700 K in a room lit by household bulbs makes the bulbs look white, as a phone camera would.
Exposure
A physically lit scene spans a huge range: a moonlit field is a few thousandths of a nit, a sunlit wall thousands of nits. The camera's exposure maps that to the image. It is expressed as EV100, the exposure value at ISO 100; one EV more halves the brightness of the image. The exposure applied is 1 / (1.2 · 2^EV100): a surface of 1.2 · 2^EV100 nits reaches the tonemapper's white.
Each camera component has an Exposure group with three modes:
ExposureMode | How EV100 is chosen |
|---|---|
| Auto (default) | Meters the rendered image and adapts towards it at AutoSpeedUp / AutoSpeedDown EV per second, within AutoMinEV100 (−4) and AutoMaxEV100 (18). AutoMetering picks Average, CenterWeighted or Spot metering. NightCurve keeps night scenes darker than day. Needs Rendering.PreExposure; without it the camera uses its Physical settings. |
| Manual | ManualEV100 (default 13). |
| Physical | From the lens Aperture and the ShutterTime and ISO: EV100 = log2(N² / t · 100 / ISO). The defaults f/8, 1/125 s, ISO 100 give EV100 13. |
ExposureCompensation adds stops in every mode (positive brightens). The read-only EV100 and FinalExposure show the exposure in use. See Camera Component for the lens and the other camera settings.
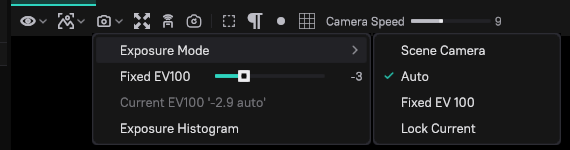
The editor viewports have their own Exposure menu in the toolbar: Scene Camera (the exposure of the scene's camera and the post-process volumes at the viewport), Auto (the default), Fixed EV 100 (set with the Fixed EV100 slider in the same menu) and Lock Current (keeps the current exposure). The menu also shows the Current EV100 and can turn on an Exposure Histogram. If the game camera looks right but the viewport is white or black, check this menu.
Pre-exposure
Daylight values exceed what 16-bit render targets store with precision. With Rendering.PreExposure on (the default), the renderer multiplies light by the view's expected exposure as it enters the scene colour, so both a moonlit night and a sunny day fit. Auto exposure requires it.
Emissive materials
Emissive surfaces are set in luminance too. In the default material, the emitted luminance is EmissiveColor × EmissiveIntensity, and EmissiveUnit says what the intensity means: Nits, EV100 (nits = 2^(EV − 3), so 10 is 128 nits) or RelativeEV (stops relative to the view's exposure, for emitters that must read the same at any exposure). With EmissiveLighting on, emissive surfaces also light their surroundings in global illumination and ray-traced direct lighting. See Materials.
Setting up a scene
Daylight exterior. Add a directional light with the defaults (110,000 lux, 5700 K). Add a sky light in Dynamic mode with both intensities at 1, and tag the sky with SkyLight. Leave the camera on Auto exposure, or use Manual with ManualEV100 15. A white surface in the noon sun then renders at a normal brightness.
Interior lamp. Add a point light; the editor creates it with 800 lm at 2700 K. Leave Range on Auto. Expose the camera for an interior: Auto, or Manual around EV100 5 to 7. To make the lamp's light look neutral, set the camera's WhiteBalanceKelvin to 2700 K.
Scene > Lighting > Apply Scenario sets the sun or moon, the sky, the cameras' exposure and white balance and the fog of a whole scene to a time of day or kind of place (clear noon, golden hour, overcast, blue hour, full-moon night, interior by daylight, interior at night, studio) as one undo step. Projects can add their own scenarios in Lighting/LightingScenarios.ddl.
Reference values
Light sources
| Source | Value |
|---|---|
| Candle | 12 lm |
| Household bulb, 40 / 60 / 100 W incandescent equivalent | 450 / 800 / 1600 lm |
| Torch | 300 lm |
| Car headlight, halogen low beam | 1500 lm |
| Fluorescent tube, 1.2 m T8 | 3350 lm |
| LED panel, 600 × 600 mm | 3600 lm |
| LED street light | 10,000–20,000 lm |
| Sodium street light, 250 W | 28,000 lm |
| Stadium floodlight | 150,000 lm |
| Phone or monitor screen | 200–500 nits |
| Neon sign | 1000–5000 nits |
| Fluorescent tube surface | about 11,000 nits |
| Clear blue sky | 3000–10,000 nits |
Illuminance
| Situation | Lux |
|---|---|
| Sun above the atmosphere | 128,000 |
| Direct sun at noon | 100,000–110,000 |
| Clear sky alone (shade) | 10,000–20,000 |
| Overcast day | 1000–10,000 |
| Office | 300–500 |
| Living room | 50–150 |
| Street at night | 5–20 |
| Full moon | 0.1–0.3 |
Exposure
| Scene | EV100 |
|---|---|
| Bright sun on sand or snow | 16 |
| Clear day, sunlit subject | 15 |
| Overcast day | 12–13 |
| Office interior | 7–8 |
| Home interior at night | 5–6 |
| Lit street at night | 3–4 |
| Landscape under a full moon | −3 to −2 |
Console variables
| CVar | Default | Description |
|---|---|---|
Rendering.PreExposure | true | Writes light pre-multiplied by the expected exposure. Required for Auto exposure and daylight values. |
Rendering.Lighting.CutoffIlluminance | 0.5 | Lux at which lights with Range Auto end. Lower reaches further and costs more. |
Rendering.Exposure.AutoCalibrationEV | 0 | Auto exposure only: shifts the metered EV100 by this many stops. Positive brightens. |
Rendering.Exposure.LowPercentile | 10 | Percentage of the darkest pixels auto exposure ignores. |
Rendering.Exposure.HighPercentile | 90 | Auto exposure ignores the pixels brighter than this percentile. |
Rendering.Emissive.RelativeReferenceEV100 | 10 | EV100 that RelativeEV emissive materials are measured against in ray-traced lighting, which has no single view exposure. |
All of them are saved with the project.
Troubleshooting
| Problem | Cause and fix |
|---|---|
| The scene is white after setting real sun values. | The camera is exposed for a dim scene. Use Auto, or Manual with EV100 around 15. |
| The viewport is white or black while the game camera looks right. | The viewport's Exposure menu is on Fixed EV 100 or Lock Current. Switch it to Scene Camera or Auto. |
| A camera in Auto mode does not adapt. | Rendering.PreExposure is off; the camera uses its Physical settings. |
| Highlights or the sun show black or magenta pixels in daylight. | 16-bit overflow. Turn on Rendering.PreExposure. |
| A spot light gets brighter when its cone narrows. | Reflector is on, as with a real reflector lamp. Turn it off to keep the beam's brightness. |
| Changing the light colour does not change the brightness. | Colour is normalised to luminance 1. Change Intensity. |
| An area light gets dimmer when it is made larger. | It is in lumens, which keep the total output. Switch IntensityUnit to Nits to keep the surface brightness. |
| Lights reach too far or cost too much. | Raise Rendering.Lighting.CutoffIlluminance, or set Range explicitly. |
| An emissive sign disappears in daylight. | Its nits are far below the scene. Raise EmissiveIntensity, or use RelativeEV for signs that must always read. |